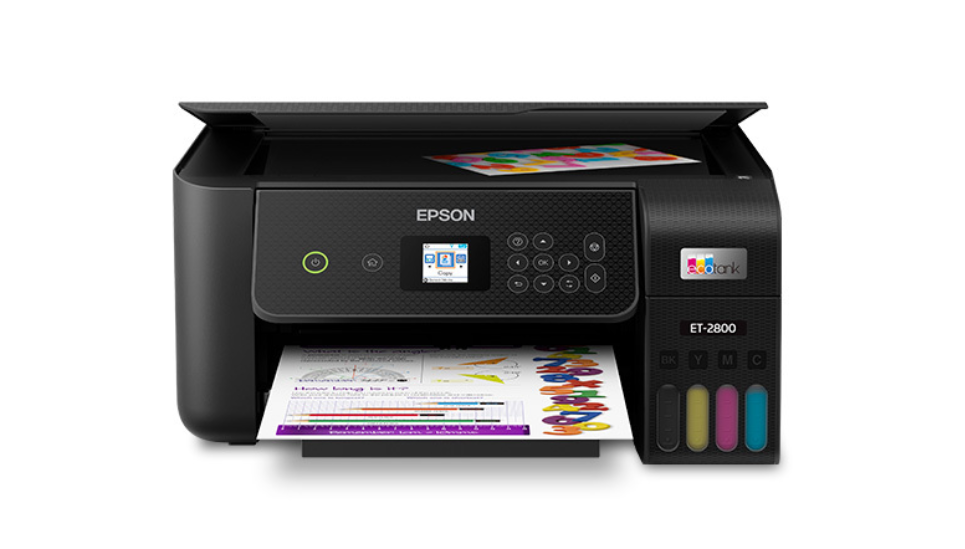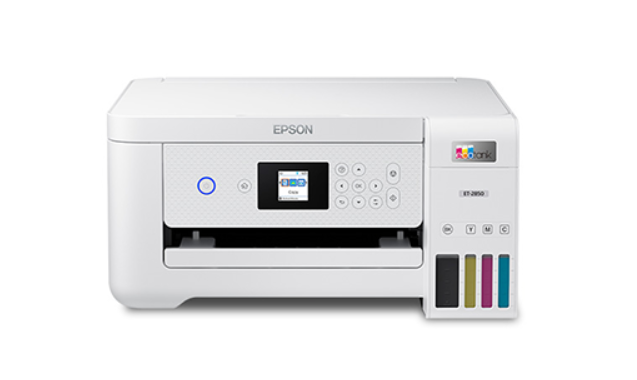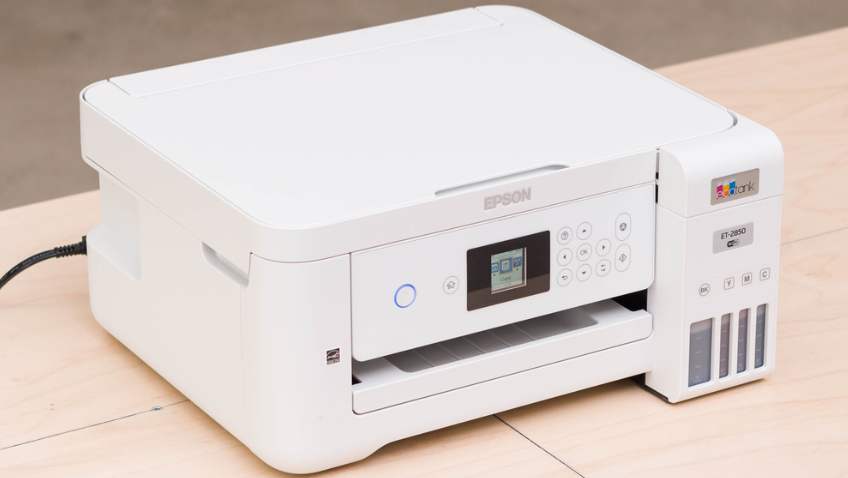
The Epson EcoTank ET-2850 is a compact, all-in-one inkjet printer that belongs to Epson’s EcoTank series—known for its innovative cartridge-free printing system. Unlike traditional inkjet printers that rely on disposable cartridges, the ET-2850 features refillable ink tanks that are easy to top up and deliver thousands of pages of printing before needing a refill. This design significantly reduces waste and ongoing ink costs, making it a more sustainable and economical choice for everyday use.
As an all-in-one printer, the Epson ET 2850 supports printing, scanning, and copying, and offers automatic duplex printing for two-sided documents. It’s compatible with Wi-Fi, Wi-Fi Direct, and mobile printing via the Epson Smart Panel app, AirPrint (iOS), and Mopria (Android), making it incredibly versatile for both wireless and wired environments.
Thanks to its high-resolution printing (up to 5760 × 1440 dpi) and quiet, efficient operation, the EcoTank 2850 printer is ideal for:
-
Home offices that need reliable, high-volume printing without frequent ink changes
-
Students who require consistent output for assignments and projects
-
Families managing a range of needs from schoolwork to occasional photo printing
Step-by-Step Epson EcoTank ET-2850 Setup
Setting up your Epson EcoTank ET‑2850 involves a few key stages: preparing the printer, installing ink, configuring Wi‑Fi, and downloading software for your device. Follow this guide carefully to ensure your printer runs smoothly from the start.

Physical Setup
Unpack the Printer: Remove all protective materials from inside and outside the device, including tape and packaging foam.
Connect Power & Turn On:
-
Plug in the power cord and press the power button.
-
Select your language, region, and time/date on the control panel.
Fill the Ink Tanks
-
Open the ink tank cover and lift the caps.
-
Match each ink bottle color to the tank label (BK, C, M, Y).
-
Let the ink fill automatically—EcoTank bottles are designed to stop when full.
-
Close the caps and cover once filled.
-
Do not press down or squeeze the bottles.
Load Paper
-
Pull up the rear paper support and adjust the guides.
-
Insert plain A4 or Letter-sized paper and slide the guides inward.
-
Extend the output tray if needed.
Initial Ink Charging
-
On-screen prompts will guide you through ink charging (~10–12 minutes).
-
Do not turn off the printer during this step.
Driver & Software Installation
Download the Software
Visit www.epson.com/support/et2850.
Choose your OS and download the Combo Package Installer, which includes:
-
Printer Driver
-
Scanner Driver
-
Epson ScanSmart
-
Epson Software Updater
Run the Installer
-
Launch the installer and follow on-screen prompts.
-
Select Wi‑Fi setup, USB setup, or Ethernet setup depending on your preference.
Driver Installation on macOS
-
macOS users may need to allow security settings or install via AirPrint (basic) or Epson driver (full feature).
-
Restart after installation if prompted.
Wireless & Network Setup
Option 1: Using Epson Smart Panel (Mobile Setup)
-
Download the Epson Smart Panel App (iOS/Android).
-
Follow the in-app instructions to detect your printer and connect to Wi-Fi.
-
Use this method for mobile-first users or if you’re not near a computer.
Option 2: Wi‑Fi Setup from Printer Panel
-
Press the Home button > Wi-Fi Setup > Wi-Fi Recommended.
-
Choose your network from the list and enter your password.
-
Confirm connection success on the display.
Option 3: WPS Setup
If your router supports WPS:
-
Press the WPS button on your router.
-
Within 2 minutes, select Wi‑Fi Setup > Push Button Setup (WPS) on the printer.
-
Wait for confirmation.
-
For best results, connect to a 2.4 GHz Wi-Fi band—5 GHz is not supported
Mobile & Cloud Printing Setup
The Epson EcoTank ET‑2850 offers seamless mobile and cloud printing capabilities, allowing you to print directly from your smartphone, tablet, or Chromebook—without needing a wired connection or traditional desktop setup. Whether you're working from your phone or using a cloud-based document service, the ET‑2850 is built to support your wireless lifestyle.

Print from Smartphone Using Epson Smart Panel or iPrint
1. Epson Smart Panel App (Recommended)
-
Download the Epson Smart Panel app from the App Store (iOS) or Google Play (Android).
-
Connect your mobile device to the same Wi-Fi network as your printer.
-
Follow the in-app setup to detect and link your Epson ET‑2850.
You can:
-
Print documents and photos from your phone
-
Scan and save to mobile or cloud storage
-
Monitor ink levels and print status
2. Epson iPrint App (Alternative Option)
-
Also available for iOS and Android
-
Offers more print layout controls and remote printing features
For Spanish-speaking users searching "como prin desde mi celular a un printer epson et‑2850", this method provides a simple, app-guided experience that works on most mobile devices.
AirPrint & Mopria Compatibility
The ET‑2850 supports native mobile printing through popular built-in protocols:
AirPrint (iOS/macOS)
-
No app required. Select your printer from the share/print menu on iPhone or Mac.
-
Works for photos, web pages, emails, PDFs, and more.
Mopria Print Service (Android)
-
Most Android devices come pre-installed with Mopria.
-
Simply go to Print > Select Printer > ET‑2850 on your device.
No additional driver or app installation is needed with these options, making them perfect for quick tasks.
Chromebook & Cloud Printing Alternatives
Although Google Cloud Print has been discontinued, Chromebook printing is still easy with the ET‑2850:
Chromebook Setup Steps:
-
Ensure your Chromebook and ET‑2850 are connected to the same Wi-Fi network.
-
Go to Settings > Advanced > Printing > Printers.
-
Select Add Printer and choose Epson ET‑2850 from the list.
-
Confirm and save settings.
Supported via native Chromebook print framework—no extensions required.
Troubleshooting Epson ET‑2850 Setup Issues
Even though the Epson EcoTank ET‑2850 is designed to be user-friendly, you might run into some common setup challenges—especially during Wi-Fi configuration, driver installation, or ink monitoring. Below are frequent problems and practical solutions.

Can’t Connect to Wi-Fi
If your printer fails to connect to Wi-Fi, first make sure you’re attempting to connect to a 2.4 GHz network—since the ET‑2850 doesn’t support 5 GHz. Check that the Wi-Fi password is correct and avoid special characters that might not be recognized. If the signal is weak, move the printer closer to the router. Restarting the router and using the WPS setup method—available through the control panel—can often resolve the issue. You can also reset the printer’s network settings via Home > Settings > Restore Default Settings > Network Settings to start fresh.
Printer Not Showing on Network
When the printer doesn’t appear on your device or in the Epson Smart Panel app, it’s often due to network mismatch. Ensure both your computer or mobile device and the ET‑2850 are connected to the same Wi-Fi network. You can verify the printer’s IP address under Network Settings > Wi-Fi Status. If no IP is listed, the printer isn’t connected. Try setting it up again, temporarily disable any firewall or antivirus, and reinstall the printer using the Epson software tools.
Drivers Not Installing on Windows 11
Driver installation issues on Windows 11 can stem from outdated or incompatible files. Download the most recent Windows 11-compatible drivers from the official support page. To avoid permissions errors, run the installer as Administrator and disable Windows Defender if it blocks the process. If automatic detection fails, manually add the printer through Device Manager or update the driver using the Epson Software Updater. As a temporary fallback, AirPrint may allow basic printing, though some features may be limited.
Ink Levels Not Displaying
If the Epson Smart Panel or ScanSmart software shows inaccurate or missing ink levels, the likely cause is the use of a generic driver like AirPrint rather than the official Epson driver. Ensure the full driver suite is installed. You can also view ink levels directly on the printer through Maintenance > Ink Levels. Keep in mind that the ET‑2850 uses a usage-based tracking system, so manually refilling the ink without prompts may result in misreported levels.
Frequently Asked Questions (FAQs) About Epson ET‑2850 Setup
1. Do I need to use the Epson Smart Panel app to complete setup?
No, the Epson Smart Panel app is recommended for convenience—especially if you're setting up the printer via a smartphone or tablet—but it's not required. You can also complete the setup using a Windows PC or Mac by downloading the driver and software package directly from the official Epson support page. The app simplifies wireless configuration and gives access to mobile printing, scanning, ink level monitoring, and firmware updates.
2. Can the ET‑2850 connect to 5GHz Wi-Fi networks?
No, the Epson ET‑2850 only supports 2.4GHz Wi-Fi bands. If you're using a dual-band router, make sure to connect to the 2.4GHz SSID. If your network is broadcasting both bands under one name (SSID), it’s recommended to split them into separate SSIDs for reliable connectivity during setup.
3. What if my Windows 11 PC doesn't detect the printer?
If your computer doesn’t recognize the printer during setup, ensure you’re using the latest driver compatible with Windows 11—not an outdated one or a generic AirPrint driver. You can install the official driver manually through Device Manager or use the Epson Software Updater to check for updates. Also, make sure the printer is on the same network and not blocked by firewall settings.
4. Is the setup different on macOS compared to Windows?
The overall process is similar, but macOS users may rely more on AirPrint if they skip downloading the full Epson driver suite. For full functionality—like scanning and duplex settings—it’s best to install Epson’s macOS-specific software from the support page. You may also need to allow software from trusted developers in your System Preferences if you're using macOS security restrictions.
5. How do I scan to my computer?
To scan from the Epson ET‑2850 to your computer, you need to install Epson ScanSmart, which is included in the driver package. After installation, you can initiate scans from either the printer’s control panel (if your PC is on and connected) or directly from the ScanSmart software. Make sure the printer and computer are on the same network.